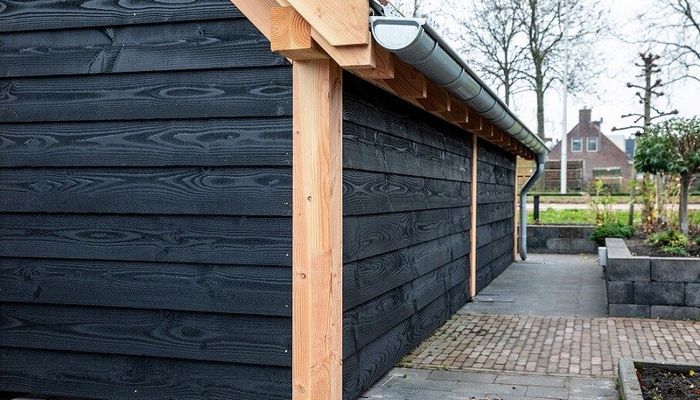
Black stain
Exterior wood can quickly turn grey and become damaged by weather and sun. With the black exterior stain Osmo Country House Paint, you give the wood a deep black color and long-lasting protection.
Products in this knowledge item;
What is Country House Paint?
Has your garden recently been fitted with new wood that you would like to give a black color? Or do you want to enhance existing wood or provide better protection? Then it is wise to apply a black stain. Wood naturally has a long lifespan, but due to daily exposure to weather, wind, and sun, it can quickly turn gray or dry out. To ensure that the wood acquires a beautiful deep black color and lasts as long as possible, we recommend applying a black exterior stain. Osmo’s Country House Paint, consisting of a unique combination of oil and hardwax, optimally protects exterior wood against moisture, dirt, and damage. The oil gives the wood a stylish look, while the hardwax hardens within the top fibers of the wood and offers optimal protection. This product provides the protection of stain combined with the coverage of paint.
On this page, we discuss black exterior stain. Are you looking for a black interior stain instead? Then read about our black stain for indoor use.
Benefits of Black Stain
- Optimal coverage
- Long-lasting protection
- High performance
- Natural ingredients
What is exterior stain?
There are various options for beautifying and protecting exterior wood. One of the most popular products is an exterior stain. A stain protects the wood from the inside out and regulates moisture. There is a distinction between a transparent and an opaque stain. A transparent exterior stain usually contains little to no color pigments. An opaque stain applies pigments that give the wood a different color while simultaneously protecting it against discoloration. The darker the stain, the more pigment it contains, and therefore the more protection it offers against the sun. For example, when you apply a black exterior stain, the wood will be protected for a long time against UV radiation damage due to the black pigments.
Are you looking for a colorless or transparent exterior stain? Then check out our page on transparent exterior stains.
Why choose black exterior stain
First of all, you should choose a black stain because you like its final appearance. An exterior stain gives wood a deep black color but—unlike paint or varnish—does not obscure the wood grain. Unsure how a black exterior stain will look on your fence? You could first do a test on the wood to determine if the look matches your expectations.
Black stain not only gives wood a modern and rustic look, but thanks to the high pigment content, it also optimally protects the wood against graying caused by the sun. Additionally, the finish penetrates the wood, where it hardens in the top fibers of the plank. This creates a moisture- and dirt-repellent surface that does not peel and is also easy to maintain. If you clean and maintain the wood regularly, the treatment can last for years.
Products for staining wood black
Stain or paint?
For an opaque coloring on exterior wood, two options are often considered: paint or stain. Although both products can achieve a similar appearance, they are nevertheless very different. Whereas a stain – as explained earlier – penetrates the wood and offers protection from within, paint applies a protective layer to the wood that seals the surface. Due to the coloring film layer, moisture and dirt cannot penetrate the wood. Paint is also capable of protecting wood against moisture, dirt, and damage for years; however, paint is significantly less low-maintenance than wood. For example, it is more difficult to touch up a paint layer locally without creating a color difference. The paint layer can also peel due to the shrinking and expanding of the wood. For a surface that is protected for as long as possible and is low-maintenance, it is therefore advisable to choose a stain.
What can you use black stain on?
Osmo Black Stain, better known as Country House Paint, can be used on virtually all surfaces. Because our exterior finishes consist of a unique formula with a very thin consistency, the black stain can even be applied to very hard wood types. Are you planning to apply the black stain to hardwood? Then ensure that the wood can weather first. To do this, you need to acclimatize the wood outdoors in all weathers for an average of six weeks. Acclimatization ensures that the wood fibers open up and can absorb the finish more easily. This allows the black stain to penetrate deeper into the wood and protect it for longer.
Has the wood (partially) turned grey due to weathering? Then make sure you first de-grey the wood with the Osmo Power-Gel Wood De-greaser. The Power-Gel extracts dirt and greying from the wood and restores the natural color. Preferably do not apply the black stain over greyed surfaces. This traps the dirt, which can cause the wood to rot from the inside out.
How can you stain wood black?
Do you want to apply black stain? Before applying the black stain to the entire surface, first perform a test on a small piece of wood. This allows you to test whether the stain adheres sufficiently to the wood and whether the appearance meets your expectations. Is the test successful? Then you can use our step-by-step plan to treat the entire surface.
- Stir the black stain thoroughly. This ensures that the ingredients and pigments in the product are well mixed.
- Apply the first coat of the Black Stain to the new or sanded wood using a block brush or floor brush. Ensure you work in thin layers.
- Make sure to remove any imperfections within 15 minutes of applying the coat. Think, for example, of brush strokes or brush hairs.
- Allow the first coat to dry for 10 to 12 hours before applying the second coat. Drying may take longer at temperatures higher or lower than 23 degrees and humidity higher than 50%. Ensure good ventilation at all times. The black stain cannot be applied during bad weather and rain.
- Apply a second coat of Black Stain. Apply it in the same way as the first coat.
- Allow the second coat to dry as well; see point 4.
Need help with your DIY project?
Are you looking for a tutorial or do you have a technical question?
DIY help needed?
find a step-by-step guide for your project in our tutorial overview
